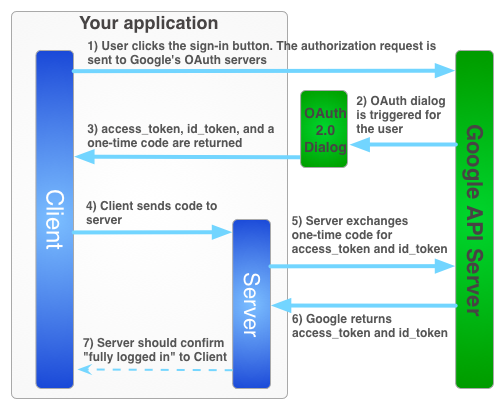
OAuth2 workflow
Google documentation on OAuth2 , see also Token Types

Source of the above image is linked to the above image
Workflow for serverside applications in Google Site
PS: To view all accesses granted to all google apps,
visit Google Security Checkup
Steps to integrate Google Login
-
Setup an app.
Credentials are different for web , android apps and javascript (old & new)- First create a project
- select "Select a project" dropdown, click, "New Project" Button.
- Then create OAuth Consent Screen
- choose if app is
internalorexternalto your organisation - Set
App Name,Support Email(usually name email of google account), Atleast oneAuthorised Domain,Developer Contact Email, other fields are non mandatory. - Add Scopes , you may choose from the list shown or manually add . To check it later, use Edit OAuth Consent, for apps API. Another important link in this regard api libraries available
- Add
Test Usersif you want to restrict the app to be used by limited ones during testing - Verify the summary
- choose if app is
- Go to Credentials page. Click
Create OAuth client ID.- choose application type. could be
Web Application,Androidetc - If it is for
Web Application, dont forget to setredirect urls
- choose application type. could be
- First create a project
-
Create Table
DROP TABLE IF EXISTS `osol_mvc__user`; CREATE TABLE IF NOT EXISTS `osol_mvc_user` ( `id` bigint(20) NOT NULL AUTO_INCREMENT, `email` varchar(255) NOT NULL, `first_name` varchar(255) NOT NULL, `last_name` varchar(255) NOT NULL, `gender` varchar(2) DEFAULT '', `picture` text NOT NULL, `DOB` date DEFAULT NULL, `address1` varchar(255) DEFAULT NULL, `address2` varchar(255) DEFAULT NULL, `city` varchar(255) DEFAULT NULL, `state` varchar(255) DEFAULT NULL, `country` int(11) DEFAULT NULL, `zip` varchar(20) DEFAULT NULL, `date_joined` datetime NOT NULL, `last_visited` datetime NOT NULL DEFAULT '1970-01-02 00:00:00', `refresh_token` varchar(255) NOT NULL, PRIMARY KEY (`id`), UNIQUE KEY `unique_email` (`email`) ) ENGINE=MyISAM DEFAULT CHARSET=latin1; -
Use GoogleLoginHelper
- Check Login
(if (isset($_SESSION['user_id'])) - show login button if not logged in
- Get Google Login URL with \Google\Client
- Verify Google Token after google redirects to site with
keyafter login - Redirect after Google Login(Success & Fail)
5.Integrate with SessionHandlerHelper Class toupdate last login time
- Check Login
-
Also add Logout Feature
unset($_SESSION['user_id']);
OAuth Application Verification
Even though the app integration is perfect, google will shwo the App not verified error after successful login.This is to protect users and their data from deceptive apps.

To get past this follow Verification for apps by google
Before you start the verification process, review the OAuth Application Verification FAQ. This will help your verification process go quickly. To start the verification process for apps, do the following steps:
- Update the OAuth consent screen details in the Google Cloud Platform Console APIs & Services Credentials:
- You must have a privacy policy URL.
- Add URLs for your homepage and Terms of Service if you have them.
- Verify your website ownership through Search Console by using an account that is a
Project Owneror aProject Editoron your OAuth project.- The same account must be a
verified ownerof the property in Search Console. For more information about Search Console permissions, see Managing owners, users, and permissions. - We can't approve your OAuth verification request
until your site ownership verification is complete. For more information, see Verify your site ownership.
- The same account must be a
- To start the verification process, submit a verification request by using the following process. Note that the Verification required dialog is a beta feature that might not be available for all users at this time.
- On the GCP Console OAuth consent screen, click Submit or Save.
- If a Verification required dialog displays:
Add information in the text boxes for Google to verify your OAuth consent screen.
When you're finished entering details, click Submit.
Note: If you add any new redirect URLs or JavaScript origins, or if you change your product name after verification, you have to go through verification again.
Common Errors
redirect_uri_mismatch
Access blocked: This app’s request is invalid
yourgmailid@gmail.com
You can’t sign in because this app sent an invalid request. You can try again later, or contact the developer about this issue. Learn more about this error
If you are a developer of this app, see error details.
Error 400: redirect_uri_mismatch
Solution:
-
Check that That Redirect URL is properly set in https://console.developers.google.com/apis/credentials?authuser=1
-
Ensure that you are not using
httpinstead of requiredhttps, when you create redirect url in your server side script.
|
|
|
|