Test if your firefox is ready
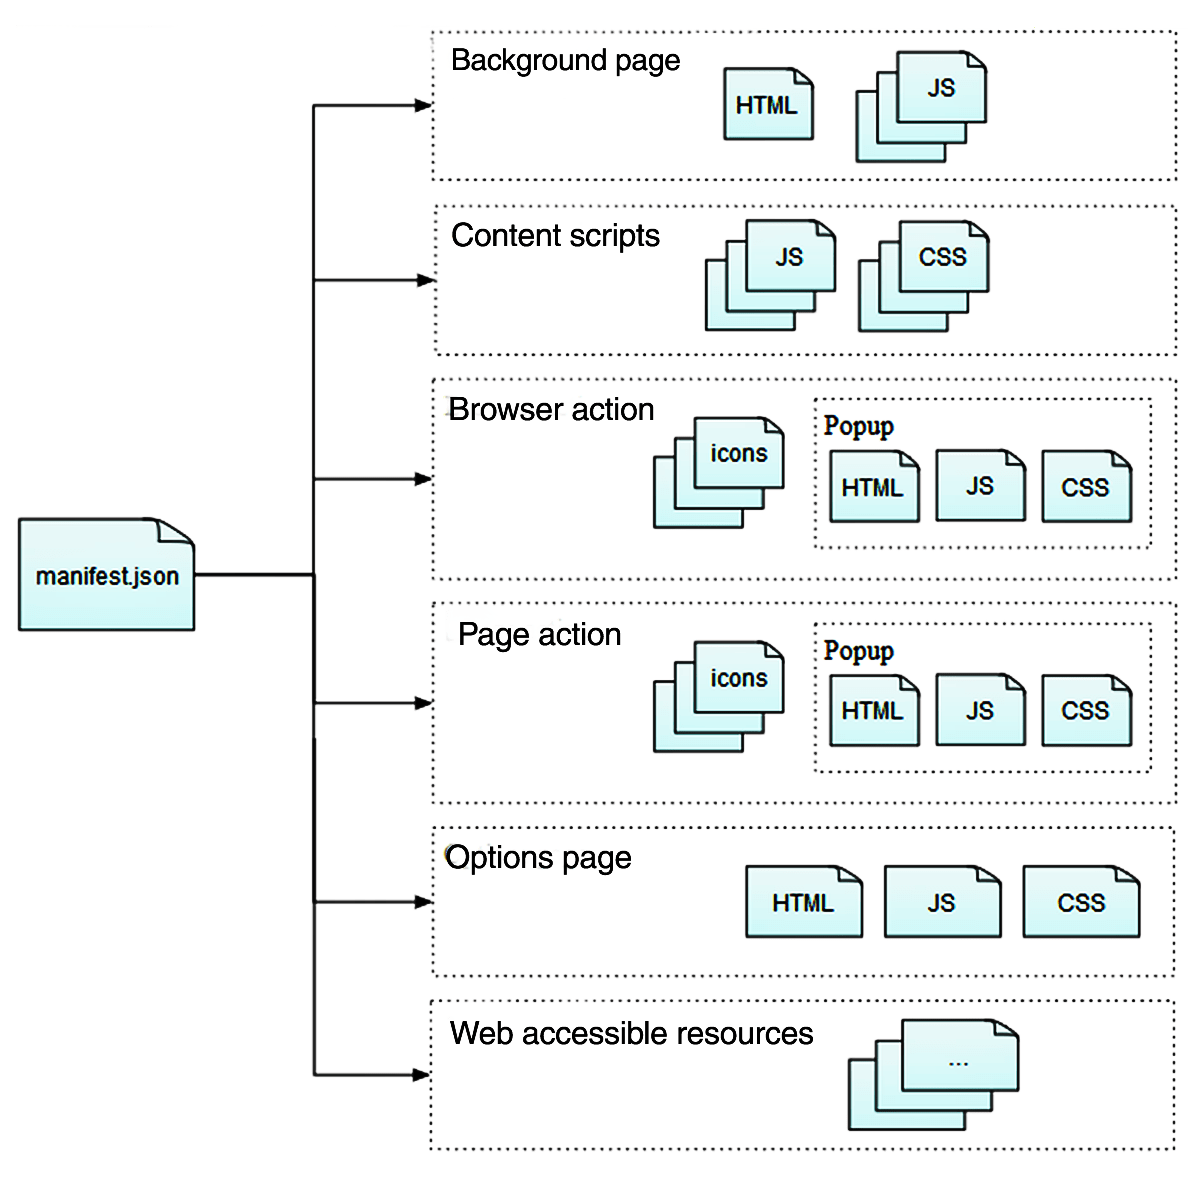
Anatomy of a plugin
As in firefox documentation

Ensure console.log works
To make console.log work in add on
- Go to
about:config - create key
extensions.sdk.console.logLevelwith valueall, if not already exists
ref
Create a new Firefox Plugin
Basically 4 steps are to be kept in mind
- Step 1 : Create a manifest.json file
- Step 2 : Create a content.js script
- Step 3 : Interscript communication
- Step 4 : Settings & Storage
Step 1 : Create a manifest.json file
Important json variables are
- manifest_version
- name
- version
- permissions
- browser_action
- content_scripts
- browser_specific_settings( for gecko id). Required if browser storage is used for settings(see below) Mandatory if the extension ID cannot be determined . See when you need to specify an add-on ID
if gecko id is not set , following error might happenError: Error: The storage API will not work with a temporary addon ID. Please add an explicit addon ID to your manifest. For more information see https://mzl.la/3lPk1aE. options.js:15:13
Sample manifest.json
{
  "manifest_version": 2,
  "name": "Upkar media manager",
  "version": "1.0", "description": "Adds Link to load temporarily from pc, go to about:debugging#/runtime/this-firefox",
  "homepage_url": "https://github.com/mdn/webextensions-examples/tree/master/beastify",
  "icons": {
    "48": "images/upkar48.png"
  },
  "permissions": [
    "activeTab",
    "storage",
    "*://mysite.com/*"
  ],
  "browser_action": {
    "default_icon": "images/upkar32.png",
    "default_title": "Upkar media manager",
    "default_popup": "popup_files/popup.html"
  },
  "content_scripts": [
    {
      "matches": ["<all_urls>"],
      "js": ["content_files/content.js"]
    }
  ],
  "options_ui": {
    "page": "settings/options.html"
  },
  "browser_specific_settings": {
    "gecko": {
      "id": "addon@example.com"
    }
  }
}
Step 2: Create a content.js script
document.body.style.border = "5px solid red";Step 3: Interscript communication
In popup.js
-
Locate current tab to send message
browser.tabs.query({ currentWindow: true, active: true }).then(sendMessageToTabs).catch(onError); /**DEFINE ERROR FUNCTION**/ function onError(error) { console.error(`Error: ${error}`); } /**DEFINE FUNCTION TO SEND MESSAGE**/ function sendMessageToTabs(tabs) { for (let tab of tabs) { browser.tabs.sendMessage( tab.id, { function: 'fetchPageInfoAndPost2Server' ,post2LocalHost:post2LocalHost} ).then(response => { console.log("Message from the content script:"); console.log(response.response); }).catch(onError); } } -
set listeners
browser.runtime.onMessage.addListener(function (message, sender, sendResponse) { -
send reply message to content
sendResponse({
        data: "Popup here, I am fine, thank you. How is life in the background?"
      });
In content.js
-
add listener
/** * Listen for messages from the background/popup script. * Call "insertBeast()" or "removeExistingBeasts()". */ "use strict"; browser.runtime.onMessage.addListener(requestIsSecondArgInPopupMessage => { console.log("Message from the popup script:"); console.log(request.function); doOperationBasedOnPopupMessage(requestIsSecondArgInPopupMessage); return Promise.resolve({response: "Hi from content script"}); }); -
send response after executing required function
          sendReply2Popup(msg)
          {
            console.log("sendReply2Popup called with  msg\r\n" +JSON.stringify(msg));
            //scripts to send message to popup and background
            function handleResponse(message) {
                console.log(`Message from the popup script:  `+JSON.stringify(message));
            }
            function handleError(error) {
                console.log(`Error: ${error}`);
            }
                console.log("sending message to popup");
                var sending = browser.runtime.sendMessage(msg);
                sending.then(handleResponse, handleError);
          }//sendReply2Popup(msg);
Step 4: Settings & Storage
Add manifest.json keys to setup a settings page
- in manifest.json, add the following
  "options_ui": {
    "page": "options.html"
  },
  "permissions": ["storage"],
  "browser_specific_settings": {
    "gecko": {
      "id": "addon@example.com"
    }
}- Add options.html
<!DOCTYPE html>
<html>
  <head>
    <meta charset="utf-8">
  </head>
  <body>
    <form>
        <label>Border color<input type="text" id="color" ></label>
        <button type="submit">Save</button>
    </form>
    <script src="options.js"></script>
  </body>
</html>- Create options.js
function saveOptions(e) {
  e.preventDefault();
  browser.storage.sync.set({
    color: document.querySelector("#color").value
  });
}
function restoreOptions() {
  function setCurrentChoice(result) {
    document.querySelector("#color").value = result.color || "blue";
  }
  function onError(error) {
    console.log(`Error: ${error}`);
  }
  let getting = browser.storage.sync.get("color");
  getting.then(setCurrentChoice, onError);
}
document.addEventListener("DOMContentLoaded", restoreOptions);
document.querySelector("form").addEventListener("submit", saveOptions);
And in content.js
- Add code to retrieve from storage
function onError(error) {
console.log(`Error: ${error}`);
}
function onGot(item) {
let color = "blue";
if (item.color) {
color = item.color;
}
document.body.style.border = "10px solid " + color;
}
let getting = browser.storage.sync.get("color");
getting.then(onGot, onError);
References
- ref 1 intro
- ref 2 more features
- Interscript communication
- Interscript communication with
promise, Promise reference - For setting up a settings page with storage
- Anatomy of a firefox plugin
- Background scripts
- Page action
|
|
|
|